Right away I must state that this executable can not read/write/understand Microsoft Excel files!
What it can do though is speak to Excel using what used to be called Object Linking & Embedding (OLE) and is now called Automation .
If you do not have a local copy of the Excel application then sorry, inter working with Excel will not work.
From here on I must assume that you do have a runable Microsoft Excel installed on the same PC/laptop as this executable.
At the end of this page there is a video covering this application and its SQLite capabilities and exchanging data with Excel.
This executable has numerous ways for a user to use Excel, all of which are internally mapped to OLE commands.
We shall start with a demo that is included in the executable, under the menu Help / Automation sub-option -Excel/SQL Demos / Import Export
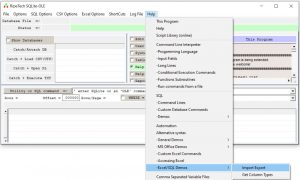
If you select this demo, then the following script is placed in the Help Panel:
IF dbopen THENMessage =" A Database is already open, save it if needed, then close it. Then rerun this demo"stopend ifdbopen ("memory")create table family ( Role text , Age int, Pic BLOB )insert into family values ( 'Father', 42, NULL)insert into family values ( 'Mother', 41,NULL)insert into family values ( 'Daughter', 4,NULL)insert into family values ( 'Son', 14,NULL)xlExit ' stop Excel completely if runningdim myWB = xlopen ' Open an empty Excel workbookqrWriteToXl ("select * from family") ' write a query result to ExcelmyWB.activesheet.name ="Family2" ' set the name of this Excel sheet to be Family2xlread ' reads the current Excel worksheet into a table
The command qrWriteToXl is a built-in flexible function for sending the results of a SQLite query response to an Excel sheet. It is discussed in more detail near the end of this page.
You might recognize the lines up to the xlExit line. There are (for me) the standard mini SQL create / insert demo.
The next 5 lines use custom commands that I have written to simplify working with Excel.
xlExit ' stop Excel completely if runningdim myWB = xlopen ' Open an empty Excel workbookqrWriteToXl ("select * from family") ' write a query result to ExcelmyWB.activesheet.name ="Family2" ' set the name of this Excel sheet to be Family2xlread ' reads the current Excel worksheet into a table
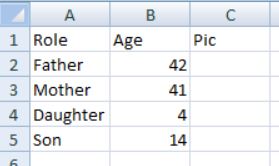
If you execute this demo script then Excel should show:
Short diversion on formatting Excel.
I like my Excel tables to have a standard appearance. So I have a custom command (actually a function) called xlTableFormat.
Function xlTableFormat ( optional myExcel = Exl)
if qrRows == 0 then
   exit Function
End IF
dim  myRow = exportedrows
myExcel.range(myExcel.cells(1,1).address, myExcel.cells(myRow, qrCols).address).Borders.LineStyle = 1
myExcel.range(myExcel.cells(1,1).address, myExcel.cells( 1   , qrCols).address).Interior.Color = RGB(216, 216, 216)
myExcel.range(myExcel.cells(1,1).address, myExcel.cells( 1   , qrCols).address).font.bold = 1
myExcel.cells.VerticalAlignment = -4108
myExcel.cells.HorizontalAlignment  = -4108
myExcel.cells.columns.autofit
end Function
When handling a query response the executable takes note of how many rows and columns there are in the query response. ( qrRows and qrCols ).
xlTableFormat goes to the active worksheet and formats the Excel cells of the response.
So if I execute the command xlTableFormat() then the Excel worksheet will look like:
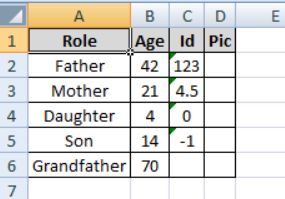
The green triangles are Excel’s way of showing that we have a text string that look like a number, but the cell is formatted as text.
To be honest, exchanging data between Excel and the executable is made complicated by text that looks like numbers and by numbers formatted as data/time. (In the case of Excel dates I have had to create a function called dbExcelDate , you can find it in the System macros panel.)
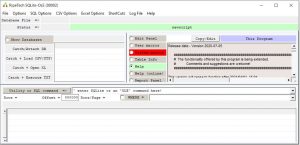
Now, back to xlTableFormat . The subroutine is part of the executable. You can find it in the System macros Panel. Press the System macros shown here in red.
If you want you can take a copy of the xlTableFormat code, copy it to the Edit Panel, edit it, execute it, and from then until the next newscript command, your version will be used and the original will be ignored.
Now, back to the database demo script.
xlExit checks whether the executable has an existing connection to Excel, if so it terminates that connection.
The second line (dim myWB = xlopen ' Open an empty Excel workbook) attempts to open a connection to Excel (via OLE/Automation), if successful it opens an empty Excel workbook and sets an internal variable (exl) to hold the identity of the opened Excel Workbook object and passes that identity to a new user defined variable called myWB.
The function qrWriteXl takes a string parameter which it expects to be a valid database query. It passes this query to the SQLite database interpreter and redirects the query results to the activesheet of the opened workbook.
The forth line myWB.activesheet.name ="Family2" follows the Microsoft VBA OLE/Automation & Microsoft Excel object model syntax and causes the name of the activesheet of the opened workbook to be set to “family2”
The fifth line xlread ... is another custom command that reads the activesheet of the active workbook to a new database table which has the name of the activesheet.
Execute the demo, using the green Execute button just above the Help Panel.
The Excel application should be activated, the family table will be exported to the open worksheet. The name of the sheet should change to Family2. There will be a little bit of movement on the top line of the Excel sheet as xlRead calculates how many rows and columns it needs to read, and whether it is to treat a column as text or numerical.
And then your main database should have two tables: family and Family2
The qrWriteToXl command can be used more than once on a worksheet, each time it is called it will move the previous worksheet contents downwards to make space for the current qrWriteXl query results.
Use the command line help("qrWriteToXl") to get more information about qrWriteX. Parameter options enable you to:
- replace the query by the contents of the lower panel,
- replace the query by the selected rows of the lower panel,
- suppress the transfer of the column names, or transfer only the column names.
The xlRead command assumes that the top line of the active worksheet contains the column names of the table to be created, and that the worksheet name is the name of the table to be created.
Parameter options enable you to:
- change the database that receives the data,
- override the name of the target table,
- and force all columns to be treated as text.
The commands qrWriteXl and xlRead are accessible via the menu Excel Options.
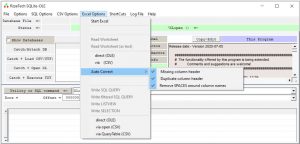
The top option Start Excel is a wrapper around xlOpen.
Read WorkSheet and Read WorkSheet (as text) are wrappers around xlRead.
When reading a worksheet there are times when the top row (used to define the table column names) has duplicates, or is empty, or has leading/trailing spaces.
The defaults for xlRead are:
- replace missing column names with the Excel column letter(s),
- expand duplicate column names with the Excel column letter(s),
- remove leading and trailing spaces (they are easy to oversee and can cause confusion when you type in a query with the column name “fred” when the actual Excel column says “fred “).
The 4 write options concern where the source data is to be taken from:
- Write SQL Query expects the Utility or SQL command => input field to hold a valid SQLite query.
- Write filtered SQL Query assumes that you have already sent some query results to the lower panel. This option will send the contents of the lower panel, including any currently not visible parts, to Excel.
- Write Listview assumes that you have already sent some query results to the lower panel. This option will send the visible contents of the lower panel to Excel.
- Write Selection assumes that you have already sent some query to the lower panel. This option will send the user selected lines of the visible contents of the lower panel to Excel.
Technical detail:
When I started (trying) to interact with Excel it was struggle to find the best way to inter-work. So I implemented a number of approaches:
- direct (OLE) inter-working is via the exchange of SafeArrays (a low level API), and now my preferred default.
- via (cvs) inter-working, read from Excel by making Excel export the data to a CVS file, which is then read in to this executable via custom CSV commands.
- via open (cvs) inter-working, write the source data to a CSV file and then triggers Excel to read that CVS file.
- via Query Table (CSV), similar to via open (csv) but uses the Query Table functionality of Excel.
Personally I do 99.99% of my work using the default: direct (OLE) .
I have found it helpful to have a custom command to read a specified worksheet from a specified Excel file.
The executable has a built-in function called xlExportToDB .
It takes 3 compulsory parameters, and 2 optional parameters.
- Name of Excel file to be opened (and closed when the function is finished)
- Name of the worksheet that holds the data to be imported to the database
- Name of the table to be created
- Optional: number of rows to be ignored at the top of the worksheet. Default = 0
- Option: whether all columns should be treated as text. Default = no
I have many scripts that read in Excel sheets and then process the imported tables.
The function xlExportToDB is heavily used by me.
It has a few tricks that I have had to learn to prevent issues, so that provided a worksheet is reasonably well formatted, and that I know how many leading rows I can delete, then the script will not crash even if the wanted sheet is hidden, or has an active filter, or has external links,…
function xlExportToDB ( FileName , sheetName, tableName , optional DeleteLineCount = 0 , optional asTextFlag = "" ) if ( isFile( FileName ) ) then Else Usererror = "File does not exist: " & FileName End If if ( dbOpen ) then sql = " drop table if exIsts \"" & tableName & "\"" Else dbOpen ("memory") End If
xlstart exl.EnableEvents = False exl.DisplayAlerts=0 exl.Application.DisplayAlerts = 0 ' 2nd Parameter = 0 prevents link update popup window exl.workbooks.open ( filename , 0)
' get the wanted SHEET, ensure it is not hidden (otherwise it is unaccessible) exl.Worksheets(sheetName).visible=1 exl.Worksheets(sheetName).select
' WARNING: if active sheet has an AutoFilter running then it affects some commands, turn the filter off If exl.ActiveSheet.FilterMode Then exl.ActiveSheet.ShowAllData End If Exl.cells.clearformats exl.DisplayAlerts=0
if ( DeleteLineCount ) then exl.range("A1:" & xlrange (DeleteLineCount,1) ).EntireRow.delete END IF
xlcreate ( , tableName, asTextFlag) xlreadappend (, tableName) xlclose exl.Application.DisplayAlerts = 1end function
There are more custom commands for Excel. (Commands that are built in to the executable are not really customizable).
- EXL
- XLALLOWED
- XLRUNNING
- XLACTIVE
- XLOPEN
- XLCOLUMNSONROW
- XLSTART
- XLSAVEAS
- XLSAVE
- XLCLOSE
- XLREADDIRECT
- XLREADVIA
- XLREADTYPEVIA
- XLREADTYPEDIRECT
- XLREADTYPE
- XLCREATE
- XLREADAPPEND
- XLREAD
- XLRANGE
- XLEXIT
Remember: you can get (some) help for these commands via the command help (“xl”) . The help command will look for any command that contains the text string in help‘s first parameter!
There are also a small number of functions/subroutines for Excel. (Which you can access from the System macros panel and modify):
- function xlExportToDB ( FileName , sheetName, tableName , optional DeleteLineCount = 0 , optional asTextFlag = “” )
- sub xlTextFileInsert ( fileName )
- sub xlColumnSubTotal ( mycol , optional myExcel = Exl)
- sub xlTableFormat ( optional myExcel = Exl)
- Function Xlat ( engName)
- function dbExcelDate ( optional schema = “main”, tbl , col , optional ddmmyyyy = 0 )
The best chance for help with functions/subroutines is to look at their definition in the System macros panel.
qrWriteToXL
A built-in command for writing the results of a SQLite query to an Excel sheet.
Parameter 1: OPTIONAL <string expression defining a valid SQL query>
Used to specify from where the information is taken.
= ‘ no value given, the current listview will be written to Excel
= “” ‘ an empty string, the current listview will be written to Excel
= “listview” ‘ the current listview will be written to Excel
= “selection” ‘ the currently selected rows of the listview will be written to Excel
= “an SQL query” ‘ the specified SQL query will be executed and used as the information to be written to Excel
else an error is triggered
Parameter 2: OPTIONAL <string expression controlling whether column names and data are written to Excel>
Actually this parameter controls three options. Each option is identifed by a text string, multiple options can be expressed in this parameter
= ‘ no value given. Default values for the options are set.
= “” ‘ an empty string. Default values for the options are set.
= “noheader” ‘ columns headers will not be written to Excel.
= “nodata” ‘ the query results (the column data) will not be written to Excel.
= “inline” ‘ the target Excel sheet is NOT shifted downwards to make space for the headers/column data
The default values have the following effects:
- Column headers are written to the Excel sheet.
- Query results (the column data) will be written to Excel.
- The target Excel sheet is shifted downwards to make space for the headers/column data
Parameter 3: OPTIONAL <string expression controlling controlling column format>
Where the qrWriteToXL command is executed, an internal step will use the Excel NumberFormat command to prepare the Excel cells for the information tobe written. Specifically, the default behaviour is:
- If column headers are to be written, then set the Excel cell formats for the header area to be “text”.
- If query results (the column data) are to be written, then set the Excel cell formats for the data area to be “general”.
You can change the Numberformat for the query result (the column data) cells by setting parameter 3 to the appropriate text string.
e.g. “@” will force the query result (the column data) cells to be be formatted by Exccel as text.
Bewarned, some of the Excel Numberformat strings are language specific: “General” in EN = “Standard” in DE !
Parameter 4: OPTIONAL <integer expression specifing the first row that the exported information is to be written to> : default = 1
By default the qrWriteToXL command writes the exported information starting at the top row of the target Excel sheet.
You can chnage the starting row by setting parameter 4 to the appropriate integer value. note: top row = 1.
Parameter 5: OPTIONAL <integer/string expression specifing the first column that the exported information is to be written to> : default = 1
By default the qrWriteToXL command writes the exported information starting at the first column of the target Excel sheet.
You can change the starting column by setting parameter 4 to the appropriate integer value. note: first column = 1.
Parameter 5 can also be expressed as a string using the standard Excel column names: e.g. column 1 = “A” column 26 = “AA”