In the Create Simple Table demo we created a first database, main, and inserted a table named family. We can then use SQLite commands such as update and alter to modify the table family, or drop to delete it.
We can create more tables within main using create.
In some cases we might want to have a main database, and then link to an existing database that was created earlier and saved to disk.
SQLite provides the attach and detach commands to create/remove a link to a disk based database.
So assuming that the disk based database has the file location c:\myDB.db3 then the command
attach 'c:\myDB.db3' as Rupert
will load the database from the specified file.
It is now entirely possible that main and Rupert have tables with the same names! In order to ensure that the correct table is accessed we should precede the table name by the database name followed by a period . .
So if both databases have a table named Prices we would query the Rupert version as:
select * from Rupert.prices
I don’t want to present a course in SQLite here. But I do want to highlight one or two features of the executable.
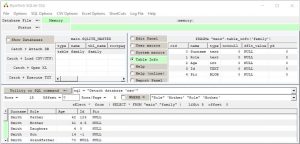
The outer interpreter of the executable monitors what is passed to the SQLite interpreter. In the case of the commands alter and detach the outer interpreter will wait until the action is completed and then update a panel in the upper left corner, shown below outlined in red. This panel shows us the list of databases that are currently open in the SQLite database engine.
If we wanted to see the tables that are in the database Rupert then left mouse click on the Rupert line. In the following image, I have attached a database file that is located at:
‘C:\Users\gds\Desktop\Nonhebel\KW26\KW26_KW22_Delta.db3’
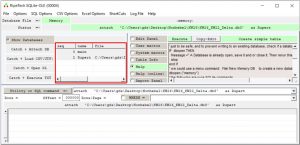
In this particular case we get a list of the (4) tables in the Rupert database.
To return to a list of the open databases, click on the Show Databases button indicated by the red arrow!
To remove an attached database use the detach command. In this case
detach Rupert
Be warned: if you modify a table that is in an attached database, then the modification goes immediately to disk!
Tips and Tricks:
If you right mouse click on a row in the red outlined Listview (above) when it is displaying the connected databases, then a popup window will offer you the ability to:
- if the connected database is attached, then detach it
- copy all the tables to one of the other connected databases
- copy the database schema name to the Where field (see the Web page SQLite – b – GUI introduction part 3)
If you right mouse click on a row in the red outlined Listview (above) when it is displaying the tables in a connected database, then a popup window will offer you the ability to:
- drop the table
- copy the table to one of the other connected databases
- copy the table name to the Where field (see the Web page SQLite – b – GUI introduction part 3)
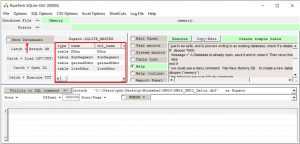
If you want to see the internal structure of a table in a database then
- left mouse click on the target tables row in the red Listview (above) when it is displaying the tables in a connected database
- click on the Table Info button, shown below in green.